
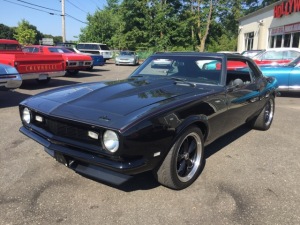
My Build
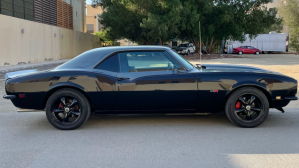
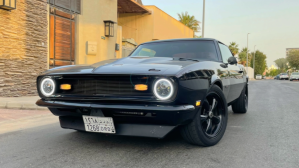
1968 Chevy Camaro SS
From Restomod to LS Swap/Pro-Touring
About
During the end of 2015, I started searching for a 67-68 Camaro, manual & semi-restored, to purchase and work on. I finally landed on a 68 Restomod that I fell in love with. Next day, I took a flight to NY, test drove it, put a deposit, and flew back to MA.
Celine had one previous owner, who restored it with original parts and some aftermarket parts. It was then sold to a dealership in Long Island, NY, which I then purchased it from in January 14, 2016.
Even though Celine was a Restomod, it still wasn’t very reliable. The Carburetor would constantly choke, over-heat and stall. It needed major tuning, and suspension adjustment. That was exactly what I was looking for, an incomplete first gen camaro to work on.
In November 2018, I decided to start my “Project LSx Swap”. The build took longer than expected due to usual surprises in a build that needed many new parts, such as new mounts, bearings, etc..
After the LS swap, it was day & night. More power, and reliability. The only thing left was to improve handling and comfort. A year later, November 2019, I decided to start on “Project Pro-Touring”. It was time to turn this ’68 into a daily driven machine.
Guide: Buying a Classic Muscle
Where to start? What to look for?
Choosing & buying a classic car is not as easy as modern cars. If you search for 1968 Camaro on any site (e.g. Hemmings.com), you’ll find many for sale at widely ranged prices ($4,000 to $200,000). So how to choose your classic muscle, will all depend on what you’re planning to do with the car. Do you want a fully built ready classic for a piece of mind, or Do you want a semi-restored classic to work on yourself?
As you know, I like to build and customize my own cars. So I was looking for a restored good condition running ’67-’68 Camaro, which is considered a Restomod. Restomods refers to classic cars being restored, including some modern upgraded parts. For First-Gen Camaros, I’ve seen the price range vary between $25,000 to $40,000. You would have to familiarize yourself with the work done to the Restomod car, and know what parts have been restored or upgraded.
Next, and most importantly is to TEST DRIVE, and make sure to look all over for rust, especially underneath the car. Don’t let a paint-job fool you. Try to find out what parts have been upgraded by the previous owner, this is important! Not knowing what parts have been upgraded might affect your build goal…Trust me, I found out the hard way when I started upgrading my suspension. (I’ll mention what happened below).
I found my ’68 Camaro SS on Hemmings, being sold by a Classic Car dealership. I test drove the car, and felt comfortable purchasing it. It was in an okay condition, the motor was healthy. I wanted a NOT-Perfect Camaro, so I can do my own full rebuild. The one annoying part is that the dealership did not have any upgrade part details that was done by the previous original owner. I had to do the research myself.
Restomod Build
My experience with the Restomod 1968 Camaro SS: I knew what I was getting myself into choosing to buy this Restomod. What I didn’t get right, was the extensive issues running a carbureted engine in hot & cold weather. The carbs would either constantly choke and stall, when it’s hot, or take ages to crank in winter.
The suspension setup that was on it made it feel like you’re driving Fred Flinstones car!! Exhaust fumes were unbearable, taking hard corners would throw you left to right…everything about this car was way beyond from being perfect.
As always, I start doing my research, reading, joining forums, and speaking with current owners for educational advice. I finally decided to go with an LS swap first, and then focus on the Pro-Touring “handling” side.
Parts on my Restomod
Engine
(Restomod)
- Fully-restored 350ci 5.7L engine (2,500 miles)
- Carburetor (Holley)
- No A/C
- X-pipes (Pypes)
- StreetPro Mufflers (Pypes)
- Closeout Panel (Detroit Speed)
Transmission
(Restomod)
- 4-speed Transmission (Muncie)
- Shift Lever (Hurst)
Suspension
(Restomod)

- OEM Coils & Leafs
- Gas-a-Just Shocks (KYB)
- 2″ Drop Spindles (McGaughys)
Wheels
(Restomod)
- AR105 Torq Thrust M (American Racing)
- 17×8, 4.5 backspace, 0mm offset
- Disc Brake 10.5″ Rotors
- C10 Chevy Calipers
- Sumitomo HTRZII 235/45/17 & 275/40/17
Aesthetics
(Restomod)
- Cowl Induction 2″ Hood
- OER Injection Front Spoiler
- G/stock Gauges (Classic Instrument)
- OEM 15″ 3 spoke Steering Wheel
- Custom 2-tone Paint-job
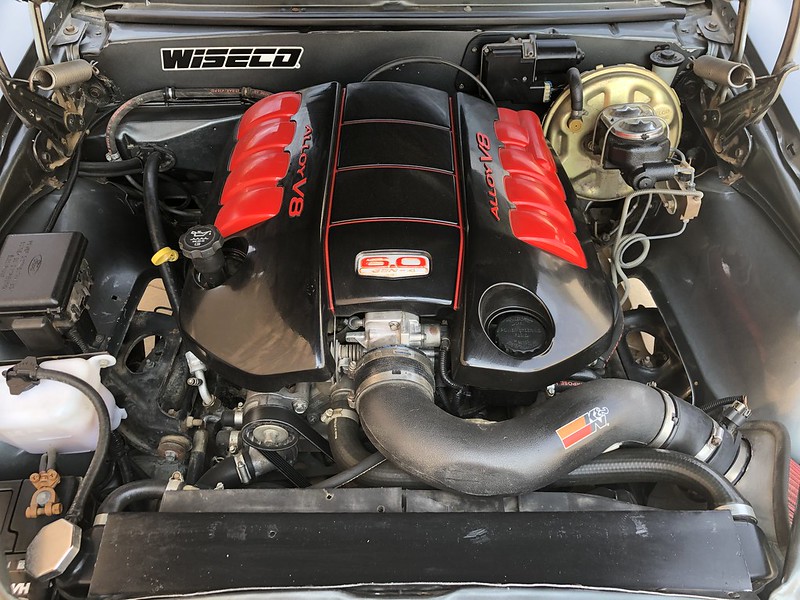
LSx / ProTouring Build
From Restomod to Reliability…
I began my LS swap project, after moving back home from the U.S. The one main issue over here, are the resources of classic parts and experienced shops/mechanics who have the knowledge on working on classic cars.
Fortunately, I was able to find a mechanic to help my with finding the engine parts, and help me with the build. I ended up going with an LSx route (which is a mix of LS parts) because parts were easier to find, rather than going for a full LS2 or LS3 swap. My goal here is to have a reliable street-driven Camaro.
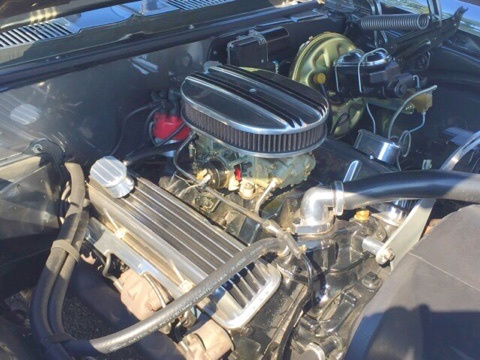
Engine (LSx)
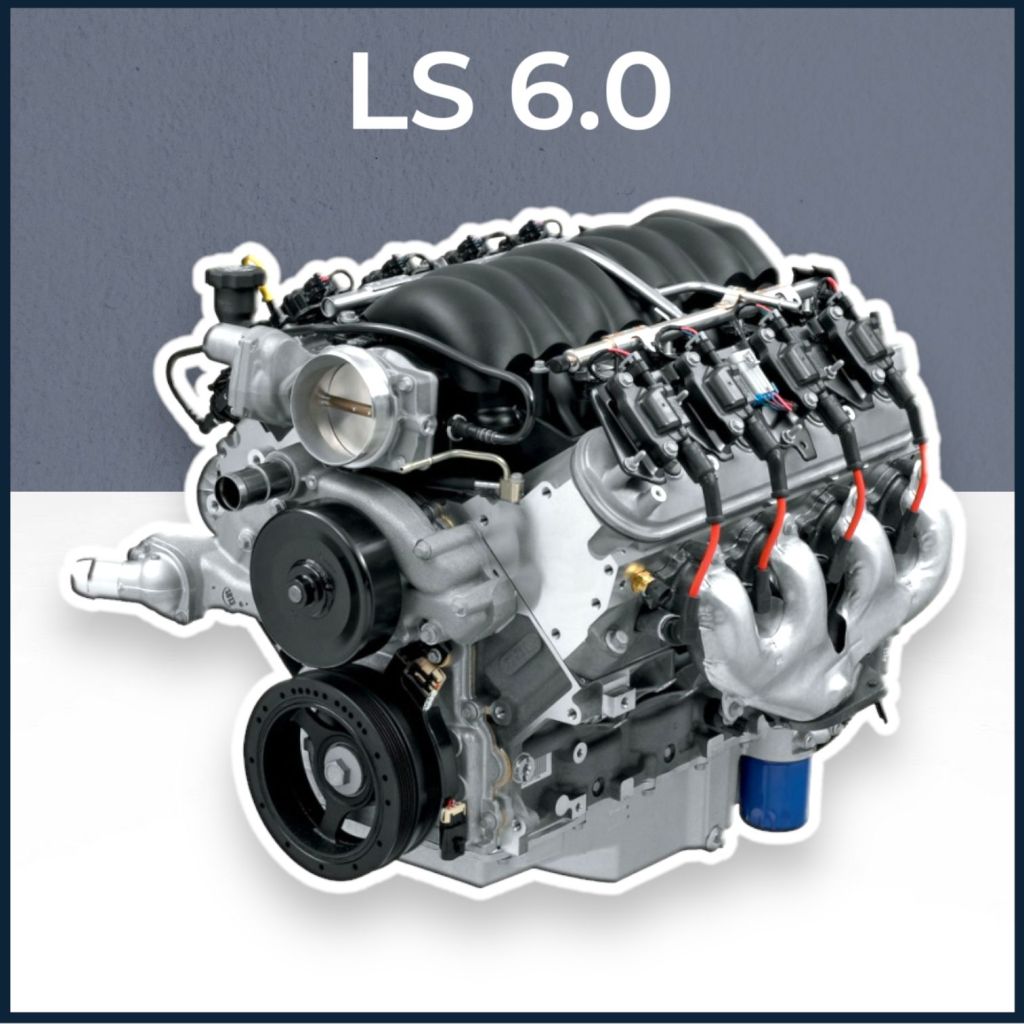
- Engine Block: LQ4 6.0L / 364 cid
- Heads: 317 (LS)
- Intake Manifold: LS Truck Style
- Throttle Body: LS drive-by-cable (GM)
- Power Steering (LS)
- Fuel System: LS Truck return-style fuel rails
- Spark plugs
- Fuel injectors
- Fuel pump
- Fuel Filter (Bosch 0450915003)
- Alternator (AcDelco 145amps)
- Air Intake (K&N 57 series)
- Aluminum Large Intercooler – Custom
- A/C compressor (LS)
- Oil Pan (GM)
- X-pipes and Mufflers: (Pypes StreetPro)
- Rear extended Exhaust Pipes – Custom
- Closeout Panel (Detroit Speed)
- Painted 6.0 Engine Cover (Holden Com.SS)

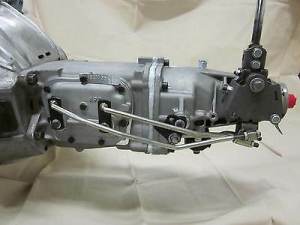
Transmission

- T-56 6-speed (Tremec)
- Shift Lever (Hurst)
- Driveshaft (LS)
- Clutches (Corvette C6)
Suspension
(ProTouring)
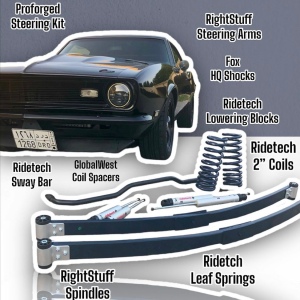
- Ridetech StreetGrip Kit, which includes:
- Shocks HQ Series Adjustable Mono (Fox)
- Coil springs 2” drop
- Sway Bar 1.125″ (Front) w/ Billet ends
- Delrin Control Arm Bushings
- Composite Leaf Springs with Billet ends
- Leaf Spring Bushings & Shackles
- Tall Ball Joints
- Lower Ball Joints
Additional parts installed:
- 1″ Lowering Block (Ridetech)
- 3/8″ Coil Spacers (Global West)
- Steering Link Kit (Ridetech/Proforged)
- Steering Arms (The Right Stuff)
The suspension setup part of the build was the most frustrating part of it all.
As mentioned above, it will help you to find out every part detail that is replaced on the car before buying it.
I found out the hard way.
Wrote up a different story on this section below.
(Tech Guides: Handling)

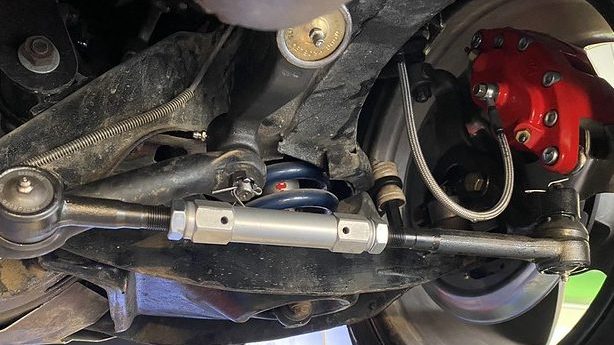
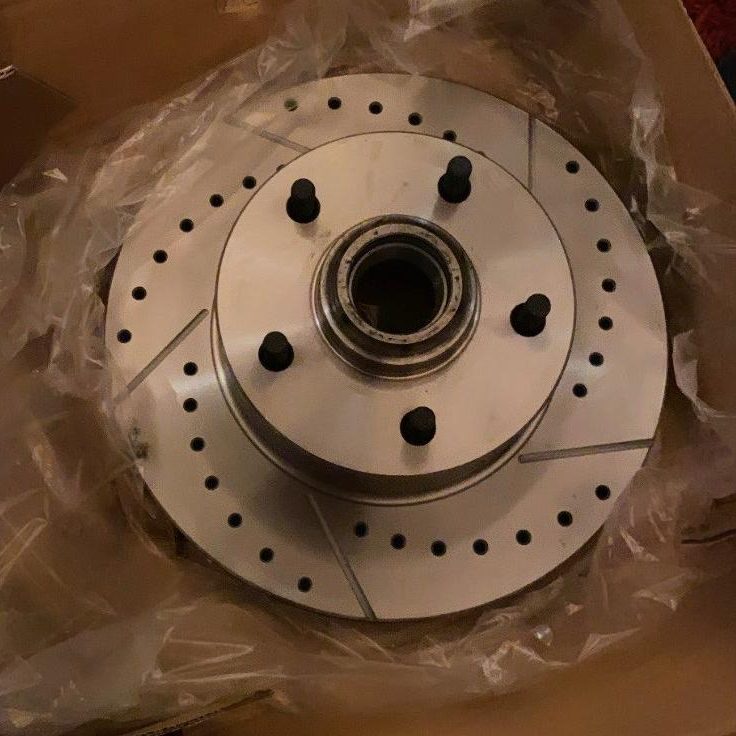
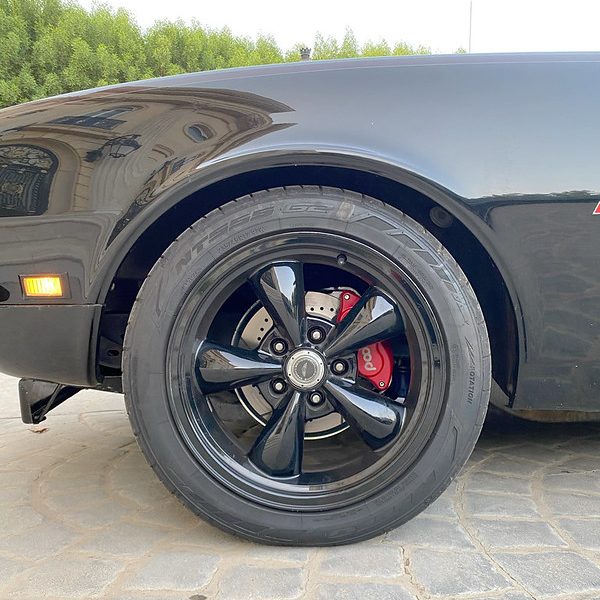
Brakes
(ProTouring)
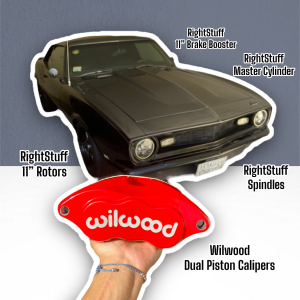
- 11″ Slotted Rotors (AFXWK32Z)
- Dual Piston Calipers (AFXWK32Z)
- Stock Spindles (DBSP01)
- Master Cylinder DBMC05 (DBMC05)
- 11′ Brake Booster RPB1001 (RPB1001 )

LQ4 Specifications
| LQ4 Performance Specifications | |
| Compression Ratio | 9.4:1 |
| Horsepower Rating | 300-330 hp |
| Torque Rating | 360-370 ft./lbs. |
| LQ4 Engine Blocks | |
| Castings | 12551364, 12573581, 12577184 |
| Material | Iron |
| Displacement | 6.0L / 364 c.i.d. |
| Bore Dia. | 4.000 in. |
| Stroke | 3.622 in. |
| Deck Height | 9.230 – 9.240 in. |
| Bore Spacing | 4.400 in. |
| Thrust Bearing Location | #3 Main |
| Main Cap Style | 6-Bolt |
| Main Housing Bore Dia. | 2.751 in. |
| Cam Housing Bore Dia. (1999-2003) | Bore 1/5 = 2.326, Bore 2/4 = 2.317, Bore 3 = 2.307 |
| Cam Housing Bore Dia. (2003-07) | Bore 1/5 = 2.346, Bore 2/4 = 2.326, Bore 3 = 2.307 |
| Cam-to-Crank Centerline | 4.914 in. |
| LQ4 Rotating Assembly | |
| Piston Material | Hypereutectic Cast Aluminum Alloy |
| Piston Style | Dished |
| Piston Volume | + 6.7cc |
| Wrist Pin Dia. (1999-07) | 0.9447 in., 0.9448 in. (Press Fit) |
| Wrist Pin Dia. (2005-07) | 0.9429 in., 0.9431 in. (Full Floating) |
| Connecting Rod Material | Powdered Metal |
| Connecting Rod Style | I-Beam |
| Connecting Rod Length | 6.098 in. |
| Connecting Rod Bolts | M9 x 1 x 43 |
| Crankshaft Material | Cast Iron |
| Crankshaft Main Journal | 2.559 in. |
| Crankshaft Rod Journal | 2.100 in. |
| Reluctor Wheel | 24X |
| LQ4 Cylinder Heads | ||
| Years | 1999-2000 | 2001-07 |
| Casting Numbers | 373, 873 | 317, 035 |
| Material | Iron | Aluminum |
| Combustion Chamber Volume | 71cc | 71cc |
| Intake Port Shape | Cathedral | Cathedral |
| Intake Runner Volume | 200cc | 210cc |
| Exhaust Port Shape | Oval | D-Port |
| Exhaust Runner Volume | 70cc | 75cc |
| Intake Valve Diameter | 2.000 in. | 2.000 in. |
| Exhaust Valve Diameter | 1.550 in. | 1.550 in. |
| Cylinder Head Bolt Style | Torque to Yield (TTY) | Torque to Yield (TTY) |
| Cylinder Head Bolt Size 1999-2003 | (8) M11 x 2 x 155, (2) M11 x 2 x 100, (5) M8 x 1.25 x 45 | |
| Cylinder Head Bolt Size 2004-07 | (10) M11 x 2 x 100, (5) M8 x 1.25 x 45 | |
| LQ4 Cam Specs | ||
| Duration @ .050 in. (int./exh.) | 191/190 | 196/207 |
| Valve Lift (int./exh.) | 0.457 in./0.466 in. | 0.467 in./0.479 in. |
| Lobe Separation Angle | 114° | 116° |
| Cam Gear Attachment | 3-Bolt | 3-Bolt |
| LQ4 Valvetrain Specs | |
| Lifter Style | Hydraulic Roller |
| Lifter Link Style | Plastic Lifter Tray |
| Lifter Body Diameter | 0.842 in. |
| Pushrod Length | 7.385 in. |
| Rocker Arm Mounting Style | Pedestal |
| Rocker Arm Style | Die-Cast, Roller Fulcrum |
| Rocker Ratio | 1.7 |
| Rocker Offset | None |
| Valve Spring Style | Beehive |
| Valve Spring Color | Natural |
| Valve Angle | 15 Degrees |
| Intake Valve Material | Steel – Solid Stem |
| Intake Valve Dia. | 2.000 in. |
| Exhaust Valve Material | Steel – Solid Stem |
| Exhaust Valve Dia. | 1.550 in. |
| Other Key LQ4 Specs | |
| Intake Manifold | Truck Style |
| Throttle Body | 80mm, 3-Bolt |
| Throttle Control (1999-02) | Cable-Operated |
| Throttle Control (2003-04) | Electronic, Drive-by-Wire (for most models) |
| Fuel Injector Flow | 24.8 lbs./hr. |
| Fuel Injector Length (between O-Rings) | 1.9 in. |
| Fuel Injector Connector | EV6 |
| PCM | Warren |
| Crankshaft Reluctor Ring | 24x |
| Camshaft Sensor | Rear Mount, 1x on Cam |
| Oil Pan | Deep Rear Sump |
| Oil Pump | Standard Volume |
Exterior/interior Upgrades
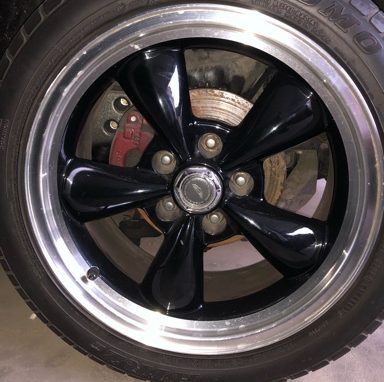
Exterior
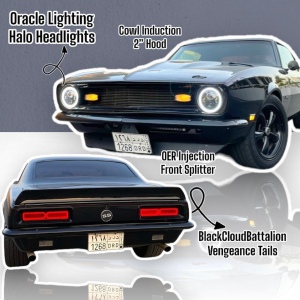
- 7″ Halo Headlights (Oracle Lights)
- Vengeance LED Tails (Black Cloud Battalion)
- 2″ Cowl induction hood (OER)
- Front spoiler (OER)
- AR105 Torq Thrust M – full gloss black (American Racing)
- NT555 G2 235/45/17 & 245/45/17 (Nitto)
- View all Exterior Photos –> HERE
- View Wheel Setup Guides –> HERE


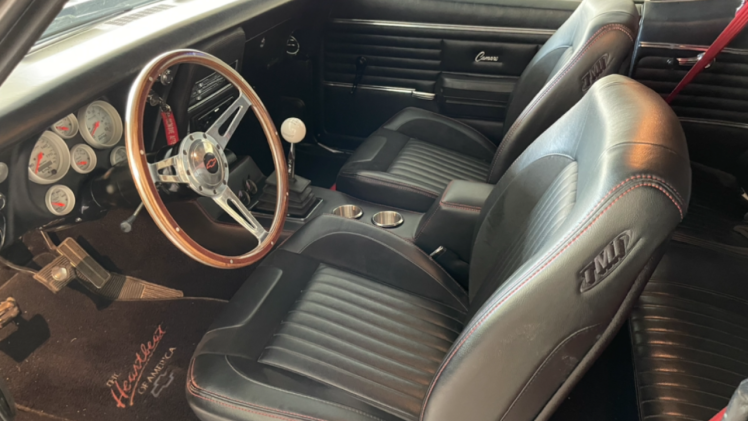
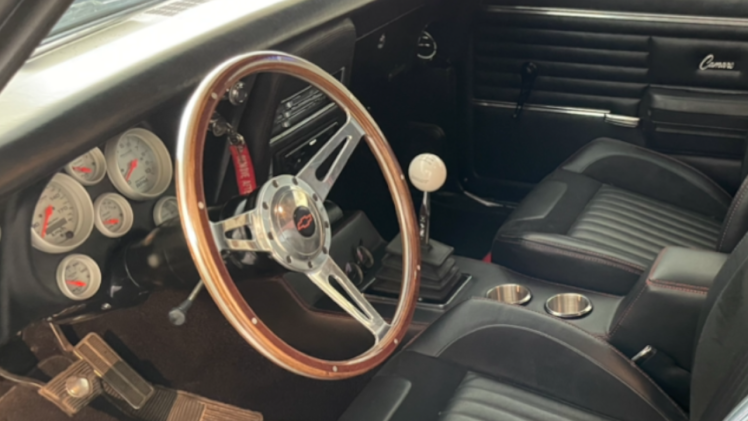
Interior
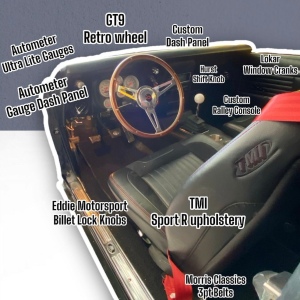
- Gauge dash panel (AutoMeter)
- UltraLite gauges (AutoMeter)
- LS gauge install kit (AutoMeter)
- GT9 retro Steering (GT Performance)
- GT9 horn button (GT Performance)
- Steering wheel adapter plate (Summit)
- Rally Console with Dash (Classic Truck Console)
- Sport R Upholstery (TMI)
- 3 point seat belts, (Morris Classics)
- Shift Lever (Hurst)
- Classic shift knob (Hurst)
- Window Cranks (Lokar Midnight series)
- Billet Lock Knobs (Eddie Motorsports)
- Mp3 Player (Sony)
- View Interior details –> HERE
- View all Interior Photos –> HERE

Camaro Instagram: @Celineblackpearl
